You can access the newly launched Peach Payments Dashboard here - https://dashboard.peachpayments.com/
In the new Dashboard, merchants and their developers (subject to user rights) are able to view and filter transactions, perform refunds (ISO Merchants), generate proof of refund documents, send and view payment links, configure ones setup with their integration and add and remove users (only possible if the user is setup as the owner or an administrator).
The first user of the merchant account added to the Dashboard will be assigned the role of the 'owner.' Should the user want to change their role, they can transfer the 'owner' title to another user. There can only be 1 user with the role of 'owner.'
Topics Covered in this Article:
- Please follow this link to the article on how to properly utilize other parts of the dashboard,
https://peachpayments.freshdesk.com/a/solutions/articles/47001224443
- See below on how to properly login,
1. Logging into the Peach Dashboard
- The user will be directed to the below login screen when accessing the dashboard

- Once your email address has been entered, you will receive a 'magic link' via email as shown below, which will grant you access to the dashboard.

- The dashboard is password-less and will automatically log a user out, the following day
- The user will then follow the same process to log back into the dashboard
- How to navigate the dashboard to add new user or change roles.
Upon entering the dashboard, start by click on the shopping basket on the top left hand side so we can insert the merchant and search for them.

Search for the merchant you’re looking for by clicking view all businesses and enter into the field as per the next screenshot


After selecting your merchant navigate to the settings button, find the teams tab and click on it.

Once you enter the teams tab find the purple button that says add members and click on it.

Upon clicking you will be prompted to the screen below and fill in the fields as per stated by the merchant/customer or if you are doing this yourself
Under the send invites, the input field there is for the email, and below that you need to select which role is needed for the specified user.
When adding the emails in the “Type and press enter” field, please do ensure to press enter after pasting email or typing the email out.

Please see below for further insight on the dashboard and a step by step guide included,
Roles and permissions
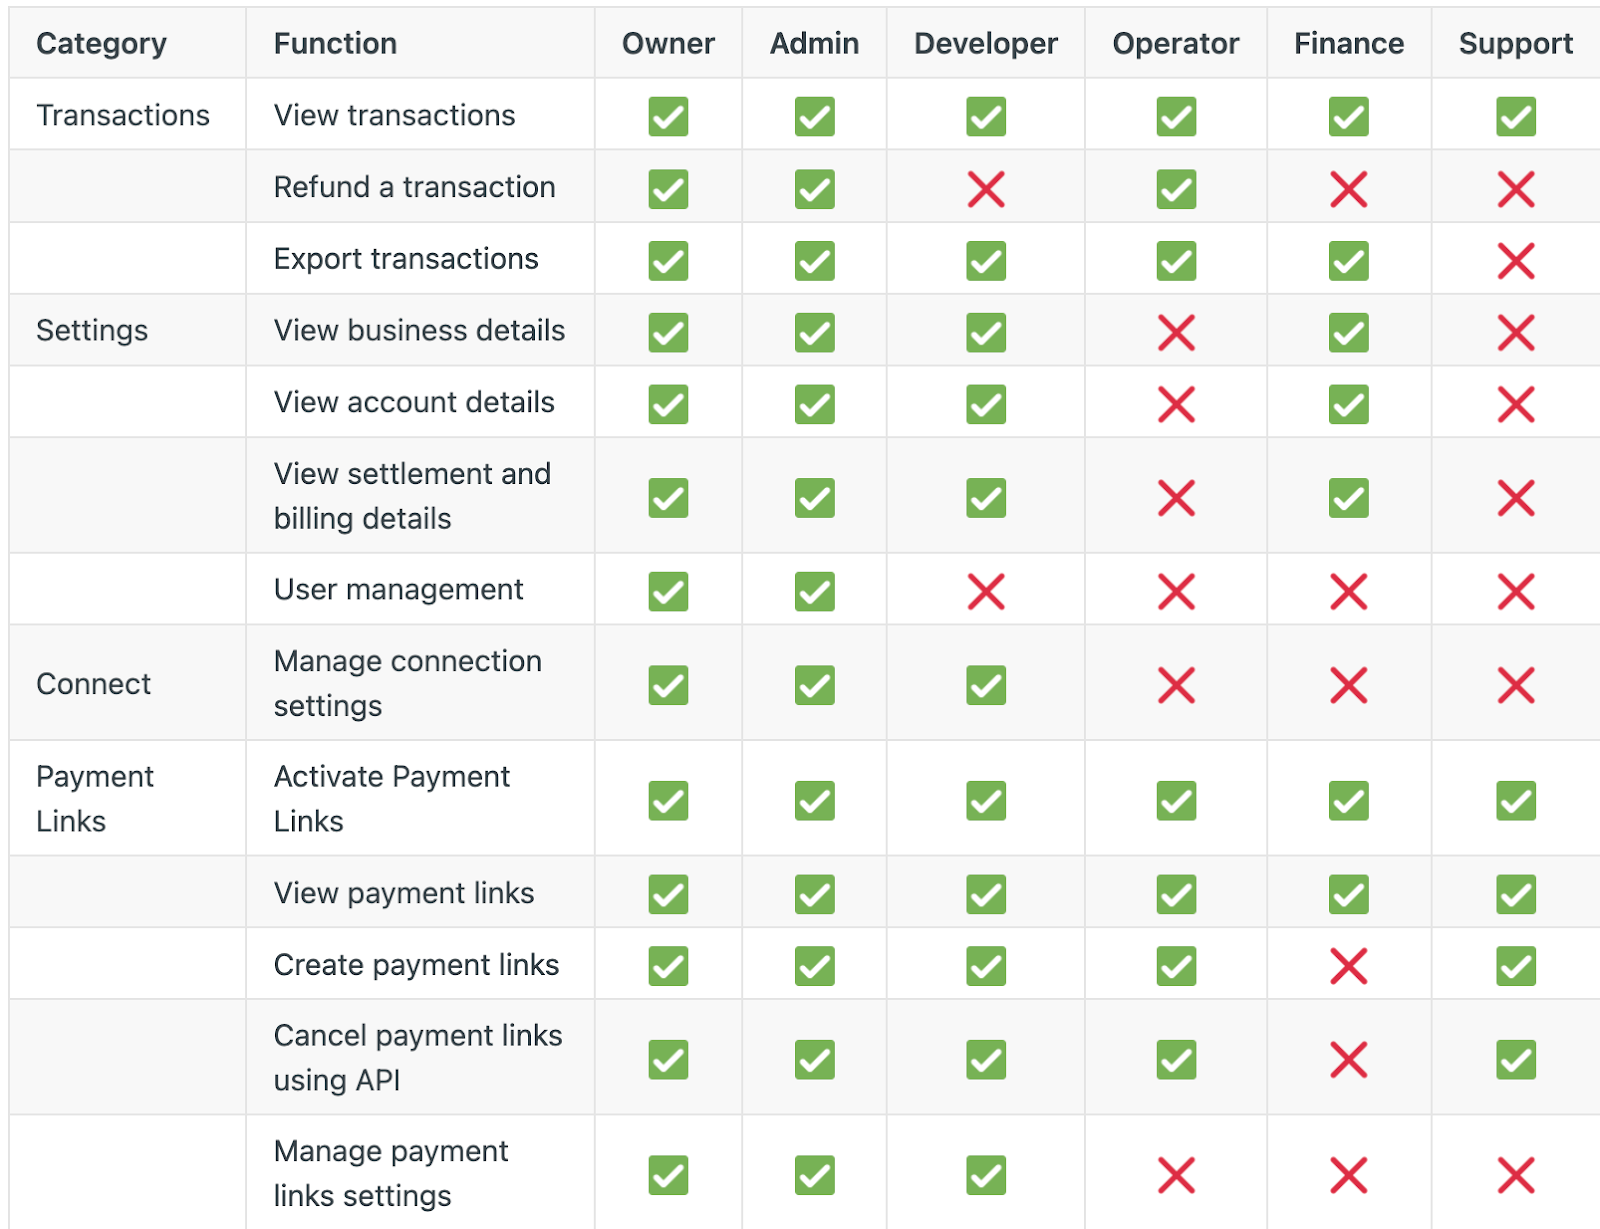
Depending on your roles, you might not have access to all functionality on the Peach Payments Dashboard:
- Owner: The first person given access to the Peach Payments Dashboard is the sole owner. The owner has access to all functions within the Dashboard. You cannot remove the owner but can transfer ownership to another user.
- Admin: Performs functions that relate to the operation of the business, but cannot change business entity configuration and compliance settings.
- Developer: Performs functions that a business requires to integrate, test, and take a service live. Can view and manage integration settings and credentials.
- Operator: Performs functions that support the operation of the business.
- Finance: Uses financial and reporting tools.
- Support: Performs functions that ensure the smooth running of the business.
You can combine developer, operator, and finance roles in any way. For example, a user can have both developer and operator roles.

Team
Manage your team
Only certain roles can manage users.
Add team members
- In the Team tab, click Add members in the upper right of the screen.
- Enter the members' email addresses, pressing Enter after each address.
- Select the roles that you want all the members to have. You can combine developer, operator, and finance roles. The summary panel on the right lists the functions that the roles provide.
- Click Send invites.
Your team members receive email invites enabling them to log in to the Dashboard.
Edit a team member
- In the Team tab, select one of your team members.
- In the details panel that appears, select the new roles that you want the user to have. You might need to deselect certain roles to have access to the other roles, for example, you cannot combine the admin role with any other role.
- Click Apply.
The team member gains the new roles.
Remove a team member
- In the Team tab, select one of your team members.
- In the details panel that appears, click the three dots in the upper right of the screen.
- Click Remove.
- In the confirmation window, click Continue.
The team member no longer has access to the business in the Dashboard.
